Wednesday, July 18, 2012

Back to Business with a DIY Guest Post

Well, I'm back and have already been busy working away on all my fabulous clients' projects.  The vacation was perfect for allowing me to clear my head and come back focused and energized.  While I am still catching up on emails and such, I thought this is a perfect time for a guest post from my wonderful designer friends, DeAnna Mackensen of REDesign Interiors.  She is definitely a DIY designer - always working on a project!

Here is her post which features her latest DIY project:


Inspired by Target and Missoni
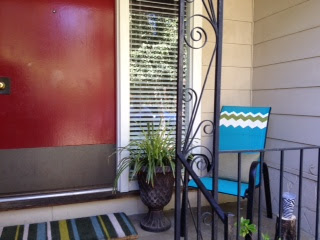
Hello, I’m DeAnna Mackensen, interior designer and owner of REDesign Interiors.  I have been a do-it-yourselfer since before that term became popular!  Last week I was inspired by Missoni and Target to DIY this chevron chair.   
Target and Missoni inspired DIY chair
I have a very small porch and I wanted to sit outside and drink my coffee every morning.  I needed a small chair and some inspiration.  The chair came from Target and the inspiration from my Missoni coffee mug.
Missoni inspiration for DIY project

Cost of Project:  Approx. $40
Materials Needed:
Target Chair (1)
Spray Paint Primer (1)
Spray Paint in white (1)
Spray Paint in Green (1)
Painter’s Tape
Target Chair for DIY project

1. Create your Chevron design
2. Block off the Chevron design with Blue Painter’s tape.  Be sure to cover the back side of the chair also.  I used painter’s tape and a sheet to cover most of the chair.  You want to be sure to cover the back so no spray paint flecks go where you don’t want them.
3. Begin with painting the large white block of Chevron with primer.  This is a fast process however be sure to allow for adequate drying time.  Follow the directions on the paint can.  The more time spent on prep means your paint job will last longer.  Be patient.
4. Spray on the white coat of paint.  Allow to dry.  Spray another coat.
Missoni inspired DIY chair
5.  Tape off the green Chevron pattern. 
6.   Spray on the green coat of paint.  Allow to dry.  Spray another coat.
Missoni Inspired DIY chair project

Time spent prepping:   30 minutes
Time spent painting:     10 minutes
Time spent waiting for paint to dry:  Priceless. . . 
Every morning I enjoy my coffee and I put my mug on that stump of firewood! 

Cheers, DeAnna

Photos by DeAnna Mackensen

Monday, July 9, 2012

Down Time

I am taking a much needed vacation this week in sunny San Diego. It comes at a perfect time. I've taken on several new projects recently and this down time will recharge my batteries.

It is amazing how being creative can be draining for me. I pour a lot of myself into my projects and clients, knowing that I am blessed to be able to do what I love for a living.

A little down time is just what I need! See you all in a week!

Friday, July 6, 2012

Inspiring Colors

Happy Friday! 

For this new project I'm working on, I decided to make a color inspiration board for the clients. They are excited to see this concept come to life in their home - and so am I!  I think I get as excited as my clients about their projects - or maybe even more than them.  I can easily conceptualize it in my minds eye while it's difficult for them to see what I envision sometimes.  Color inspiration boards are always a great tool:
What colors have been inspiring you lately?

Image by Rebecca Ward

Wednesday, July 4, 2012

4th

Wishing you a happy Independence Day!

Sunday, July 1, 2012

Photo Ready

The month of June has flown by and the blogging class I have been taking is coming to a close. 
I have once again found Holly Becker of Decor8 blog's class so enlightening.  I have been instructed by Holly and other fabulous guest teachers such as Jeanette Lunde of Fryd and Design.  Without her inspiration, I probably would never have considered and e-magazine (which I now am!).  Also, I was already a huge fan of Nicole Bach of Making It Lovely, who showed me how to find balance in work and life and how to grow your blog and possibly make income from it (I hope to one day, thank to my supportive readers!).  Katrina Tan of the Pugly Pixel showed so many creative ways to feature photos in more interesting formats.  I will definitely start to practice these tips and integrate them into my blog.

Since my blog is largely visually based, I found a great benefit from these photo teachings.  I especially enjoyed Holly sharing some of her favorite photo apps for my iPhone that I have already started to use.  One of these apps is instagram, which I have been using for a while but not really for my blog.  I love the effects that you can do to the photos right off your phone to enhance them.
Photo I took at a Sacramento River Cats Baseball game

I added a few apps to my repertoire on Holly's recommendation such as Pic Stich. This app will combine two or three photos in various configurations:
Progress photos of a recent installation
I also like Labelbox, which will allow you to add fun labels to any photo:
My cat having a crazy moment
I also picked up a photo booth app.  I chose a free one called photoautomat, which is a lot of fun!
My sister and I being goofy

Bottom line, I loved this class and would recommend it to anyone wanting to blog.  It has a great support community as well and I look forword t contiuing to get to know the other bloggers in the class.  I will soon be sharing a few new favorite blogs of mine that have come out of the class.


Photos by Rebecca Ward

ShareThis